I’ve been wanting to build an arcade-style block stacking game for a while. I’ve built multiple block stacking games in the past, first in pure Java, then in Unity 3D, but the previous games never had that arcade feel.
What better time than covid quarantine? This post is about building Stackr, a 2D block stacking game using Unity tilemaps.
Tilemaps
I recently discovered Unity tilemaps. They’re great for grid based 2D games. They allow you to paint sprites onto a 2D grid, layer them, and in my case, move them. I’ve found they are a great starting point for 2D games and levels in Unity.
Creating the Level
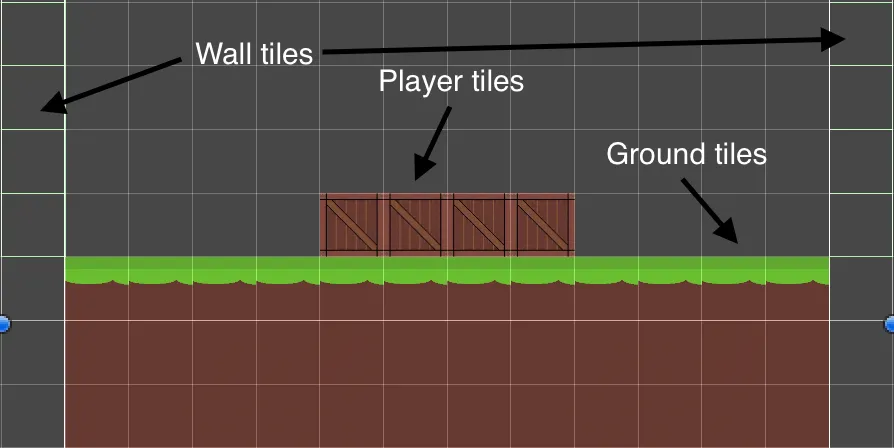
The image below shows the starting Unity scene for Stackr. The scene is represented as a grid. On the grid are three tilemaps: the walls, the player, and the ground. Each of these tilemaps lets you easily paint new sprites into the scene, each constrained to the grid system shown.
Moving the Player
When programming, you can’t always use a ‘best practice’. Make something that works and learn from your mistakes.
I chose to represent the player as a tilemap to easily add and remove player blocks using the tile painting system. I then achieved player movement by moving the player’s tilemap transform.
To move the player tiles, I attached a BlockController.cs script to the player tilemap. In the MonoBehaviour update loop, I added the following code:
Player Movement Code
private float direction = 1f;
private float moveTimeout = .5f;

void Update(){
    timeElapsed += Time.deltaTime;

    if(timeElapsed > moveTimeout){
        timeElapsed = 0;
        transform.position = new Vector3(transform.position.x + direction, transform.position.y, transform.position.z);
    }
}
Each moveTimeout seconds, this moves the player 1 unit to the right.
Collision Detection
Now, I need the player blocks to change direction when they reach the end of the grassy ground blocks. First, I need to add a rigidBody2D component to the player and a boxCollider2D component to both the player and the walls. Now, setting the wall box collider to trigger will notify the player when it collides with a wall.
In the BoxController.cs, I’ll add this code:
Collision Detection Code
void OnTriggerEnter2D(Collider2D col)
{
    if(col.gameObject.tag == "Wall"){
        direction *= -1;
    }
}
Now, when the player collides with the Wall tilemap, it will switch directions. The Wall is an invisible box collider on either side of the grassy ground.
Stacking and Falling Blocks
Now the hard part. When the user presses space (or touches on the screen on mobile), two actions occur.
First, the player blocks should move up by one space. When the player moves up, the previous block positions must be cloned, leaving behind the previous position of the player.
Next, If the blocks are misaligned when the user places the next level, the misaligned blocks need to fall away, leaving fewer player blocks. The GIF below shows this in action.
When the user presses space, first I check if the player is misaligned with the blocks below it using the trimStackr function.
Next, I clone the player blocks, disable the movement script on the clone, and move the player up by one.
Lastly, I decrease the moveTimeout variable to increase the speed at which the blocks bounce left and right.
Stacking and Falling Code
// Check for space press
if(Input.GetKeyDown(KeyCode.Space)){
    if(clone != null){ // Only trim player after first level
        // Check alignment & Trim player
        if(transform.position.x < clone.transform.position.x){
            trimStackr(trimDirection.left, (int) (clone.transform.position.x - transform.position.x));
        } else if(transform.position.x > clone.transform.position.x){
            trimStackr(trimDirection.right, (int) (transform.position.x - clone.transform.position.x));
        }
        tilemap.CompressBounds(); // Resize Tilemap
    }

    // Clone player blocks at location & disable controller script on clone
    clone = Instantiate(this.gameObject, transform.position, transform.rotation);
    clone.GetComponent<BlockController>().enabled = false;
    clone.name = "drop"+dropCount++;
    // Set clone to be a member of the grid
    clone.transform.parent = grid.transform;

    // Raise player y by + 1
    transform.position = new Vector3(transform.position.x, transform.position.y + 1, transform.position.z);

    // Decrease move timeout
    moveTimeout *= .7f;
}
The trimStackr function does the magic here. I’m not sure tilemaps are intended to have their transforms moved like I do in this game, so figuring out how to properly trim the player blocks took a while.
This function takes a direction indicating which side the misaligned blocks are on, and the number of misaligned blocks, both of which are calculated in the Stacking and Falling Code code shown above.
First the function checks if the player has lost, meaning it is trying to trim an amount greater than or equal to the amount of player blocks that exist.
Next, if trimming from the left side, the function loops through the first [trimSize] tiles in the player’s tilemap, starting at the tilemap origin (the leftmost block). If trimming from the right side, this loop iterates backwards from the rightmost tile.
For each misaligned tile, the code sets the tilemap’s value to null at that tile’s coordinates (erasing the tile) and calls a function to clone that tile and make it fall out of the world. This results in the gameplay shown in the GIF above.
Here’s the code for that function:
trimStackr Function
void trimStackr(trimDirection dir, int trimSize){
    // Check for lose condition
    if(trimSize >= tilemap.size.x){
        gameState = gameStates.gameOver;
        // Set floating blocks to red
        tilemap.color = Color.red;
        return;
    }
    Vector3Int trimTarget;
    if(dir == trimDirection.left){
        // Trim from origin
        for(int i = 0; i < trimSize; i ++){
            trimTarget = new Vector3Int(tilemap.origin.x + i, tilemap.origin.y, tilemap.origin.z);
            tilemap.SetTile(trimTarget, null);
            spawnAndTriggerFall(tilemap.GetCellCenterWorld(trimTarget));
        }
    } else{
        // Trim from origin + size, backwards
        for(int i = 1; i <= trimSize; i ++){
            trimTarget = new Vector3Int(tilemap.origin.x + tilemap.size.x - i, tilemap.origin.y, tilemap.origin.z);
            tilemap.SetTile(trimTarget, null);
            spawnAndTriggerFall(tilemap.GetCellCenterWorld(trimTarget));
        }
    }
}
Finishing Stackr
Now that stacking and falling blocks is working, the game is almost done! To finish it up, I added two more Unity scenes: a win game scene which displays a congratulatory message, and a lose game screen which prompts the user to try again. Both of these end game conditions display the game score which is calculated as the number of blocks successfully placed.
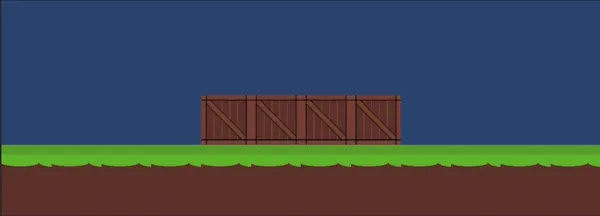
The semi-finished game is shown below.
Note: I’ve left out sections of the game code for simplicity. There is additional code needed to handle declaration and instantiation of variables, sound effects, scoring, win / lose conditions, and scene changing. If you’re interested in the complete code, feel free to message me on social : )